
Ready to transform your outdoor space? In this post, I’ll show you how I built a deep raised garden bed using only free lumber. Whether you’re a seasoned gardener or just starting out, I’ll guide you step-by-step through the process so you can create your own thriving garden with minimal expense.
Introduction
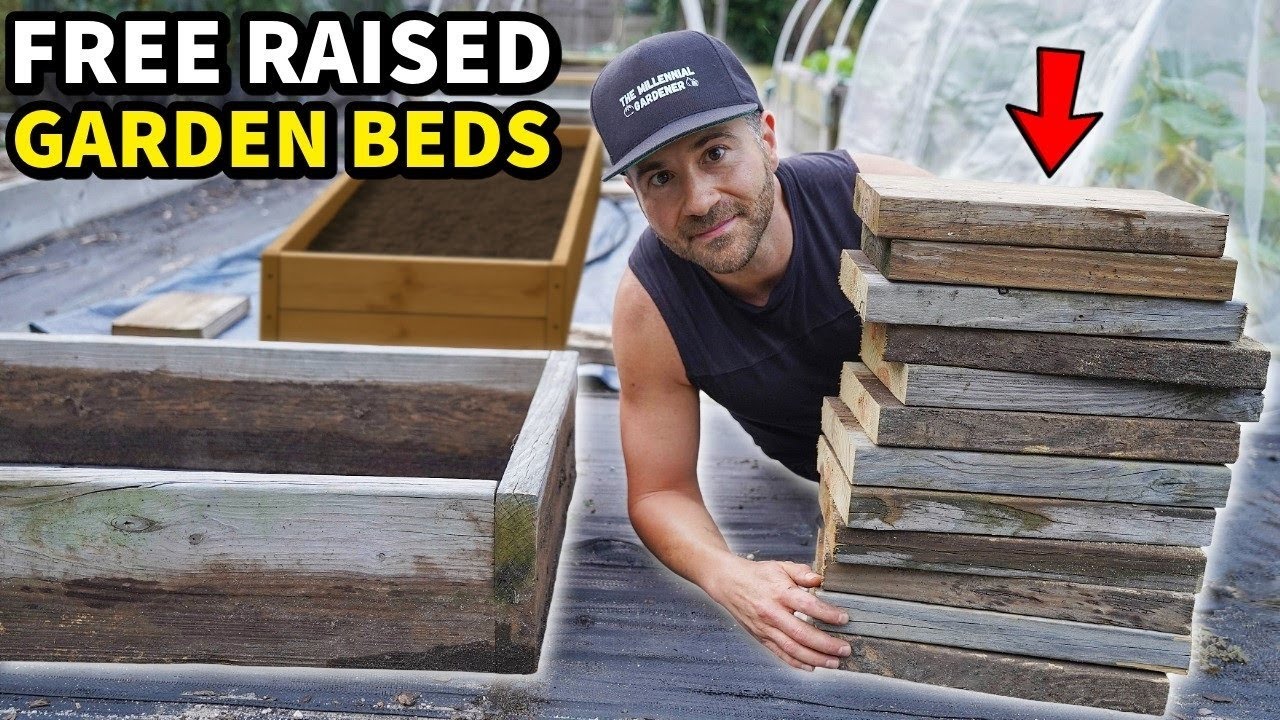
Picture this: a tired gardener gazing out at a patch of earth, dreaming of lush vegetables and fragrant herbs but haunted by the thought of digging and hauling heavy supplies. Enter the modern miracle—building a deep raised garden bed haphazardly flung together from scraps and free lumber, transforming what once was a patch of dirt into a verdant sanctuary. This isn’t some fancy, “only for seasoned carpenters” project but a craft anyone with basic tools and a pinch of patience can master. I recently dipped my toes into this green-thumb adventure thanks to a wonderfully humorous and straightforward step-by-step video from The Millennial Gardener, who clearly has a knack for making gardening accessible—and even a little fun. If you’ve ever wondered whether you could build a sturdy, environmentally conscious, and attractive raised bed without breaking the bank, read on. I’ll share my journey, the tips I learned, and how you can replicate this rewarding project with minimal fuss but maximum satisfaction.
Building a deep raised garden bed from free lumber isn’t just about planting—it’s about reclaiming space, feeling accomplished, and getting your hands dirty in a way that feels both practical and poetic. The best part? You don’t need a garage full of fancy tools or a degree in architecture. All it takes is some ingenuity, a little elbow grease, and the perfect online tutorial to guide you through each step—from sourcing your scrap lumber to filling the bed with garden gold. Whether you’re an urban dweller with limited space or an aspiring permaculture enthusiast dreaming big, this DIY project bridges the gap between practicality and whimsy, proving that even a novice can turn a pile of reclaimed wood into a thriving green oasis.
So, grab a cup of coffee—perhaps with a dash of skepticism—and let’s dive into how I turned a handful of old boards into a thriving deep raised garden bed, all while chuckling at my own misadventures along the way. Because, as it turns out, building something beautiful from free materials isn’t just about saving money; it’s about creating a piece of your own personal paradise that stands resilient against the elements and just might make your neighbors stop and stare at your newfound horticultural prowess.
Watching the Video: A Step-by-Step Gardening Epic
The moment I pressed “play” on The Millennial Gardener’s tutorial, I knew I was in good hands. The video kicks off with a friendly, approachable tone—like a neighbor sharing farming secrets over the fence—yet it’s packed with technical know-how that demystifies the entire process. From sourcing scrap lumber, which in my case involved rummaging through a neighbor’s pile of mismatched boards, to cutting and assembling the planks into a deep, functional bed, the video walks you through each step in a way that’s easy to follow even if you’ve never wielded a power tool before. The key for me was the clear visual cues: the use of a speed square to ensure perfect corners, the gentle tap of a rubber mallet to persuade the wood into its proper place, and the quick tips sprinkled throughout that save time and frustration.
What struck me most was the emphasis on safety and efficiency. The guide recommends donning safety glasses and work gloves—an absolute necessity after reading about those errant splinters—and shows how a basic drill bit kit can make assembly smoother than butter. Everything is explained with a casual humor that kept my spirits high, even as I wrestled with the more stubborn pieces of reclaimed lumber. The entire process from sourcing the scrap wood—whether you find it in a local make-do pile or snag it from a hardware store surplus—to finishing touches was documented, making it feel accessible. And, if you’re thinking about building a new raised bed with fresh lumber, the video linked to a detailed DIY guide that handles that side of the project with equal finesse.
As my project progressed, I appreciated the advice on installing optional features like sturdy railings for sitting and easy access, turning my simple garden bed into a hybrid of planter and outdoor lounge. Watching the process unfold in real time, with troubleshooting tips and common pitfalls in tow, transformed a daunting task into a manageable, even enjoyable experience. The video not only taught me how to build but also inspired confidence—perhaps even the audacity to plan for multiple beds, each more ambitious than the last.
Filling, Amending, and Thriving: Tips for Garden Success
Once your masterpiece of reclaimed wood is assembled, the real magic begins—filling that garden bed with the right soil, nutrients, and amendments. Here’s where my adventure took a turn from “Rookie with a hammer” to “Gardener with a plan,” thanks to some sage advice from the video and a few trial-and-error experiments. The host emphasizes the importance of not simply dumping store-bought potting mix into your lovely frame but instead creating a rich, layered foundation that will nourish your plants for seasons to come. I learned that you can use compost, peat moss, and well-aged manure, mixed with mineral amendments like rock phosphate and kelp meal, to make a mix so lush and inviting that even the tomatoes seemed eager to grow.
Filling the bed isn’t just about dumping soil; it’s about amending it with garden products like weed barriers, insect netting, and shade cloth—if you’re planting sensitive seedlings in southeastern North Carolina’s Zone 8B, where the sun can be relentless and pests relentlesser. The video demonstrates installing a weed barrier first, to save yourself from constant weeding, then filling the bed with a carefully curated blend of organic matter. It’s a dance of layering—earth, compost, amendments—all topped with mulch that retains moisture and keeps weeds at bay. What I found most helpful was the emphasis on testing the soil pH, adding fertilizers as needed, and consistently nurturing the soil structure to ensure healthy plant growth.
The final flourish was the installation of trellises and railings, which doubled as seating options—because what’s better than admiring your hard work while savoring a freshly picked tomato or a handful of herbs? The whole process is a labor of love, and understanding that our garden beds aren’t static but dynamic ecosystems makes all the difference. You’ll learn that a little ongoing maintenance—watering, fertilizing, and occasional soil amendments—goes a long way toward turning that deep raised bed into a thriving vegetable and flower haven.
FAQs: Your Burning Questions About Building Deep Raised Garden Beds
Q1: Can I build a deep raised garden bed using only free, recycled lumber, and how do I ensure it’s durable enough for outdoor conditions?
Absolutely! Recycled or scrap lumber can be just as sturdy as new wood when assembled carefully. The key is choosing rot-resistant options like cedar or pressure-treated lumber, or at least ensuring the wood is untreated if you plan to use organic gardening methods. Proper sealing and lining the wood with a landscape fabric can help extend its life. You’ll want to build your bed with sturdy screws, using the right tools like a drill and speed squares, and reinforce the corners for stability. The video tutorial from The Millennial Gardener demonstrates how to do all this, making it surprisingly straightforward to turn trash into treasure—without sacrificing durability.
Q2: What’s the best way to fill a deep raised bed for optimal plant growth?
Filling a deep garden bed isn’t just about dumping dirt; it’s about creating a layered, nutrient-rich environment. Start with a weed barrier on the bottom to prevent pesky weeds from invading your lush sanctuary. Then, fill with a mix of compost, aged manure, and garden soil—preferably organic—ensuring drainage and fertility. Incorporating amendments like kelp meal or bone meal can promote healthy root development. The key is sourcing quality organic fertilizers and regularly amending the soil to keep plants thriving, especially in a zone like 8B, where the growing season is long and conditions can be challenging.
Q3: How do I incorporate seating or sitting rails into my raised bed project without compromising plant space?
The trick is to use the upper edges of your wooden frame to install sturdy, weather-resistant railings—think rustic barn wood or planed lumber—that double as seats or resting spots. The tutorial shows a simple method of attaching additional wood sections to serve as railings, which can be sanded smooth for comfortable sitting. This not only enhances the aesthetic but turns your garden into an outdoor lounge—perfect for evening herb harvests or relaxing with your coffee. Just ensure these additions are securely fastened to prevent wobbling, and consider their height for comfortable sitting without infringing on your plants’ growth.
Q4: Are there any specific tools you recommend for someone starting out with building a raised garden bed?
Yes! The essentials include a cordless drill with a variety of drill bits, a robust set of screws, a speed square for perfect 90-degree cuts, and a rubber mallet for persuading stubborn boards into place. Additional helpful tools are a measuring tape for precision, a Japanese pull saw for clean cuts, safety glasses to protect your eyes from splinters, and work gloves for hand protection. For moving materials, a garden cart can make your life much easier. With these in hand, even a beginner can confidently tackle the build, guided step-by-step by the video tutorials available online.
Q5: How can I support creators like The Millennial Gardener while enhancing my gardening knowledge?
Supporting creators is as simple as shopping through their Amazon storefront or merchandise store—tools, seeds, or gardening accessories that they recommend often come with affiliate links, which help fund future content. Following them on social media platforms like X and Instagram allows you to catch quick tips, seasonal updates, and community Q&A sessions. Many of these channels are treasure troves of hacks, DIY guides, and inspiration. Plus, engaging with their content motivates them to keep sharing valuable insights, making your gardening journey richer while helping you stay connected with a network of enthusiasts who share your passion.
Final Thoughts
Building a deep raised garden bed from free lumber isn’t just a project; it’s a reminder that ingenuity and a little patience can turn seemingly ordinary materials into something extraordinary. Watching a tutorial, getting your hands dirty, and witnessing your backyard transform into a lush tapestry of green feels like a small rebellion against the retail-industrial complex. It’s an act of reclamation, a nod to sustainability, and—if you’re lucky—a source of endless joy and fresh vegetables to boot. The process taught me that gardening and DIY are ultimately about connection—both with the earth and with the community of fellow enthusiasts eager to share their hacks. So, whether you’re planting your first seed or filling a sprawling raised bed for years to come, remember: your garden is your canvas, and with some free lumber and a bit of courage, you’re well on your way to a thriving, beautiful future.